Wednesday, January 30, 2013

Italian Board Tablescape


My Italian Board Tablescape
comes from a luncheon I had at my house
for a group of friends who gather once a
month for a luncheon.


Today it was Italian and I presented everything on 
a pizza board or peel with white dinnerware.
Everything looked so dramatic against a stark
black tablecloth and red roses.


This pizza board was from the manufacturers of our
pizza oven - Mugnaini.  All of them have been well used so
are a little brown on the front edge which
makes it a little more authentic.


Salads were presented in square white bowls


And topped with a skewer of cheese and tomato and wrapped
in a leaf of fresh basil.  This is actually basil left from my
garden.


I just made a cutting of my garden basil
and placed it in a vase of water.  It quickly rooted
and it has continued to grow with a fresh change
of water every few days.


Oil and vinegar and salad dressing also dress the board
so guests can use the amount they want.


Fresh Italian flatbread was served for dipping in the oil and vinegar.


I had the pizza oven going and baked them fresh
as guests were gathering.  

Of course this could be done in the oven too.


Here they are hot out of the oven, bubbling with 
extra virgin olive oil, Italian seasonings and sea salt.
These I baked a little shorter than I would pizza as I
wanted them to be soft rather than crispy.
I just used my pizza dough recipe.


The main event was the Soft As A Cloud Manicotti.


The ladies had said they wanted to learn how to make
so I had one prepared without the frosting.  I demonstrated
the bottom row and then everyone took
turns trying their hand at it.  The beautiful thing
is that if you make a mistake, you can just
use a butter knife and pull the rose off.


Then we each had a piece and everyone was sent home with 
a large slice to show off their handiwork.

Two of the ladies have already made them at home
and sent me a photo.  It was fun learning something new.


Another two of them have already made the manicotti
for their families.


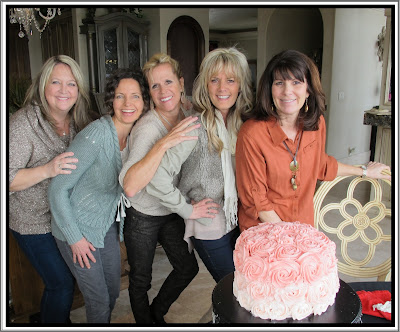
Here we are posing with the cake and 
Annette is taking the photo.


This tablescape was inspired by this charming
new restaurant we found in Cabo 
called
Pan di Bacco.

I just loved the decor especially these red french script
chairs.

The food was just as amazing.


We both gasped at the presentation as the food came
out on these cutting boards served in white bowls.

Right away I knew I had my inspiration for
my January lunch.


Of course the huge red chandelier was 
another favorite.

We definitely will be going back there.
Thanks Pan di Bacco for the inspiration.

I will be posting with


Wednesday, January 23, 2013

TV Debut and Studio 5 Tablescape


Well I completed my TV debut and I felt all of your
love and support.  It was so fun to get texts and emails
and Facebook and blog comments 
from those who had seen
it and those who wouldn't be in the area but were thinking
of me and praying for me to do well.  

 It was just a 5 minute segment
so it hops, but that makes it nice for you to watch it too.
The program is an hour long program and our show featured
seven segments.  You can watch all of them on their site.
Studio 5 has two hosts, Darin Adams and Brooke Walker.
Darin hosted my segment.

Joni (Red Couch Recipes) and her two daughters came 
to be my assistants and traveled
an hour and a half (plus the drive to Salt Lake, about 40 minutes)
to help me and to lend their support.  I really needed them
 as I had so much to carry.


I set up this display
that they call the "beauty shot" 
which I am using for my tablescape
today.  They use this as the headliner shot and the finishing
shot.

Let me just say from the minute we walked into the studio
everyone was so warm and friendly and casual that I was
instantly put at ease.  The assistants and the camera
men were joking with me and helped me feel
confident - true professionals at work!
I only had to do my "yoga breathing"
once to relax while we were waiting in the green room.

Anything I wanted or needed they were there to help.
The assistant (forgive me, I forgot her name) brought
in placemats, a napkin and flatware.


I had staged this beauty shot at home to see
what I wanted and had only planned on the breadsticks.

I added a salad as it gave the display some color and interest
after I had watched a few of the Studio 5 shows online.
I brought the white plate and bowl and the containers for
the breadsticks and also the cutting board.  A little
BYU ranch dressing was added as we always dip
our breadsticks in that.


They send you a note talking about jewelry, makeup and colors
they want you to wear.  They tell you to look at the host and 
talk to him, not to look at the cameras as you might look at
a camera and it won't be the one they are using.  

That made it easier as you forgot the cameras were there.


Here my "assistants" are in the green room enjoying themselves.
You could sit and watch the show as it was taped.  Joni and
the girls were going to stay in here to see my segment.


I was already in the studio and miked and was 
joking around with Darin while he was
cluing me in on some of the things he might ask
 when Darin wondered where Joni and the girls were.
  I said they didn't want to be in the way and would
watch it on the TV. 
 He said to go and get them, that they
could watch it at home on their TV but they should
be in there.  
What a thoughtful and kind host.

I ran right out and got them.  


Before the show they had fun sitting in the hosts' seats.


The studio was all one room with several areas for filming.
This is where the interviews take place.  I was in the
kitchen, there was the area where the girls were
on the stools and one additional place.  Just seeing that
was great.

It was so fun to get to see how it all worked but
most of all, the best part of it (besides not totally 
flubbing it as it is live) was interacting with all of the
wonderful staff and being treated so warmly and
kindly.  Even the other guests were so friendly
and chatty.  I know if I hadn't had Joni and the girls
there I would have been a lot more nervous.
Thanks everyone for your support,
including all
of my wonderful blog friends who gave me so much support.

And a huge thank you to Studio 5 who asked me to participate.


(The opening shot - hubby took a photo off the TV as he
watched it at home.)


We were all glad we did it.
(The night before I was panicking and telling my
husband he might have to call in sick for me!!  Ha ha.)

ON THE SHOW
I mention SAF yeast, which several have asked about.
Here they sell it in most grocery stores or the Bosch store.
It is the same as breadmaker, rapid rise, or instant
where you don't have to proof the yeast.  I also keep it
in my freezer.  I am using yeast from 2007 and it works fine.

I will be posting this with 

Monday, January 21, 2013

Studio 5 Appearance - Pizza Factory Breadsticks Copycat Recipe


My copycat recipe for a local restaurant's breadstick,
Pizza Factory,
is one of my most visited posts
especially due to Pinterest.

I was contacted by
to do a 5 minute segment on their show
tomorrow, Tues. January 22.  

I have done a lot of cooking classes over 
the years but never before a camera where
if you mess up it is permanently recorded.

If you live in our area, you can catch the
show starting at 11:00 am.  

Wish me luck and say a little prayer for me!
Yes, I am very nervous.

Friday, January 18, 2013

Soft As A Cloud Manicotti

We had the phenomenal opportunity
to travel to Italy in 2007 and take a
week long cooking class for our wood burning
Pizza Oven.

There Chef Alessi told us that 
"lasagna should be like a cloud"
and he said American lasagna was like a brick.


Well, this manicotti would be something that
Chef Alessi would love because it is like
a cloud.

This is a recipe I have had from college days
(many many moons ago).
In college, during finals week, when I couldn't stand
to study for another minute, I would head to the
library and read cookbooks.

I had an Italian friend living with me,
Ginger Boschi, and she and I would check 
out Italian cookbooks and made manicotti,
homemade ravioli, gnocchi, etc.

I don't have any idea what cookbook this recipe came from
but I have used it for years and served it at a luncheon
this week.  I will feature the table next week but as
some of the ladies were anxious to get the recipe, I
am posting that right away.


The secret to cloud-like manicotti is using
crepes instead of hard pasta shells.
Now don't leave me a snippy comment saying
that real manicotti uses pasta, I didn't make
up the recipe, but I highly recommend it.

Actually, what is pasta but eggs, flour and water
and this is the same, just more water than normal.


The filling is a lovely combination of ricotta and mozzarella
with a touch of parmesan.  I loved how the mozzarella
melted and created beautiful strings of cheese
as you ate it.


I made a really quick marinara that you are going to
want to try.  It is so fast and the flavor is so much better 
than a jar.

Manicotti Like A Cloud Recipe

Marinara
2 T. olive oil
1 white onion, finely diced
2 cloves garlic
2 - 28 oz cans Italian tomatoes
2 T. sugar
2 tsp. dried basil
1 tsp. salt
1/2 tsp. white pepper (or black)

Heat the olive oil in a large saucepan.  Add the onion and garlic
and saute until translucent.  Add the tomatoes and spices and
stir together.  Bring to a boil and reduce heat and simmer covered
for 20 minutes.  You can simmer longer, for an hour if you have
the time.  It will just enhance the flavor. Adjust seasoning if needed.

Filling
2 lb. ricotta
2 C. grated mozzarella
1/3 C. parmesan
1/4 tsp. white pepper (can use black)
1 tsp. salt
1 tsp. dried basil 

Mix all of the above and set aside.


Crepes
6 eggs, room temperature
1 1/2 C. flour,
1/4 tsp. salt
1 1/2 C. water

Blend all of the above in a blender until smooth.  Let rest
at least half an hour or overnight.  If you rest it overnight,
it will separate, just stir together.

Heat an 8 inch pan and spray with Pam.
Pour in about 3 T. batter and rotate the pan quickly to
spread the batter evenly into a circle.  Cook over medium heat
until the top is dry but the bottom is not brown.  Remove the
crepe from the pan and place on a plate.  Rub a little soft
butter on the top of each one using a paper towel so that
the crepes do not stick together.  Stack them on the plate
as they cool.

Heat the oven to 350 degrees.  

Place a layer of marinara on the bottom of your
baking dish.  

Spoon a couple of tablespoons of filling
down the center of each crepe.  Roll up and place
in the baking dish.  Repeat until the crepes are used
up.  This will make about 16-18 crepes and you might
have a little filling left over depending on how much you
use.  Top the rolled crepes with more marinara.  Sprinkle
additional parmesan and mozzarella on the top and bake
uncovered for 30 minutes.

(I chose to do mine in oval baking dishes and placed two
in each.  You can also make these up ahead and bake later.)


Click here for printable recipe

I will be posting this with


Thursday, January 17, 2013

Preparedness Hints


There are so many unknowns in life, it is wise to 
be prepared.  Oh, that sounds like the Boy Scouts.
I have 4 Eagle Scouts from my home, including my
husband and it is wise to be prepared.

Tonight I am teaching a class on being prepared
and food storage.  

They have asked me to teach, and include how having 
a pizza oven could help with preparedness, and then we will finish
with pizzas in the pizza oven.  I am to plan on about 35
women for the pizza.

In Tuscany, it was always traditional to cook
your bread one day a week in your wood burning
oven.  The floor of the oven would be covered with
loaves.  Then throughout the week the remaining loaves
would be eaten, obviously not as fresh as the first
day so they learned to make panzanella (bread salad),
bread soup, bruschetta and many other dishes using bread.


We try to store a lot of white flour, especially for use in the pizza
oven and I am going to share a couple of food storage secrets
I have learned with them and I will share them with you too.


Years ago while watching Martha Stewart she was finishing the
show with readers letters.  She read one that said the woman
put bay leaves in her flour bin to prevent weevils.  Martha 
said she had never tried that before.  Since I am a big
proponent of storing food for emergencies, I have had
some struggles with weevils in my flour.

I gave it a try and guess what?  It works.  I haven't had one
since and that has been years and years ago.


I also store a lot of pasta and guess who else likes to
munch on my pasta?

Yup, weevils!


I just open the package of pasta and pour in a couple of tablespoons
of table salt.  The packages are then stored in a plastic bucket like
the flour and guess what?  

Yup, no weevils for years and years.

There is so much out on Pinterest now about preparedness
and we know that we can't predict what natural disasters
might come our way.  It is a wise thing to have food stored
up and not just have enough groceries in the house for a
meal or two.  

Make food storage part of your every day life.

Wish me luck on my class tonight.

I will be sharing with

Monday, January 14, 2013

All White Cookie Pops - Christmas Circus Animal Pops or Truffles


My daughter called with a request for all white
desserts for her oldest daughter's baptism and our
first granddaughter to be baptized.  

Kylie is our oldest grandchild and she just
turned eight and is being baptized so I
decided to create a new cookie pop
as all of the kids (and the adults too) love
cookie pops for a party. 


How about Christmas Circus Animal Cookies?
They Christmas package have all white cookies,
no pinks allowed.  

We love Circus Animal Cookies and had made Circus Animal
ice cream with them this summer.  I had no idea they
would be so tasty in cookie pops.  I like them a lot better than
Of course you could pick out the white ones from the regular bag
of circus animal cookies if you care about them being all white.
Usually I won't care if they are all white.


Christmas Circus Animal Cookie Pops Recipe

1 pkg Christmas Circus Animal Cookies
(all white cookies)
3/4 container Betty Crocker's Vanilla Frosting
3 C. melted white chocolate coating discs
sucker sticks

Crush the cookies in a food processor until they are
fine crumbs.  Stir in 3/4 of a contain of Betty Crocker's Vanilla
frosting.  The frosting should be well blended in.  Form into about 30
balls, placing them on a parchment paper lined cookie sheet.
Place in fridge about 20 minutes or until the dough is stiff.

Melt the white chocolate coating in a microwave safe bowl at
30 second intervals, stirring in between whether it looks like it
has melted or not.  It will take about 3 times to melt completely.
Dip each sucker stick into a little of the chocolate and stick
into the balls.  Let that harden, then dip the balls into the
melted chocolate.  These were nice and firm and I didn't have
any problems with any of them falling off the sticks.  Decorate with
dusting sugar or other candy decor while wet.  Place in a block of
foam until the chocolate hardens or in a deep bowl of sugar.  The
sugar will hold the sticks in place until they harden.

They were really, really yummy.  I liked them better than Oreo
Cookie Pops.  They disappeared really quickly.

You could also omit the sticks and make them into truffles.
We will definitely make these again.  They received lots of oohs and aahs.


I also dipped White Chocolate Strawberries
and made


My daughter made 
Eggnog Cupcakes and Almond Cookies.

All white desserts had a very pretty effect.
This would be fun for a shower or a wedding 
or any wintery event too.


She displayed a picture of Kylie outside of the
Mount Timpanogos Temple which she had taken
on a snowy day.


This is our newly baptized Kylie, the newest member
of the Church of Jesus Christ of Latter Day Saints
(Members are baptized when they turn eight in our church -
the age of accountability or when they begin to understand right from
wrong.)

It was a beautiful day.  My daughter's husband is the
youngest of 10 and with our 5 children and all of
the family, they had 72 over to lunch afterwards.  That
was a houseful but there was plenty of food and fun.


I will be sharing this with

Tuesday, January 8, 2013

Feliz Cumpleanos A Mi


Yes, I am another year older!
For my birthday, I got out of the cold and was able to celebrate
in Cabo San Lucas, Mexico.

This was the beautiful sunrise yesterday morning with just that 
spot of sun shining through on the ocean.


This morning, I woke up to clear blue skies for my birthday.


We had gone out to dinner last night and they had our
table all decorated with these wonderful balloons.

My first birthday call this morning was from my
oldest granddaughter who accidentally added 20 years
to my age as she wished me happy birthday!  Wow,
I didn't know I was that old!


Most of the family came to Mexico with us to celebrate 
New Years
in Cabo, but they left on the weekend
so hubby and I got to spend the next few
days by ourselves.

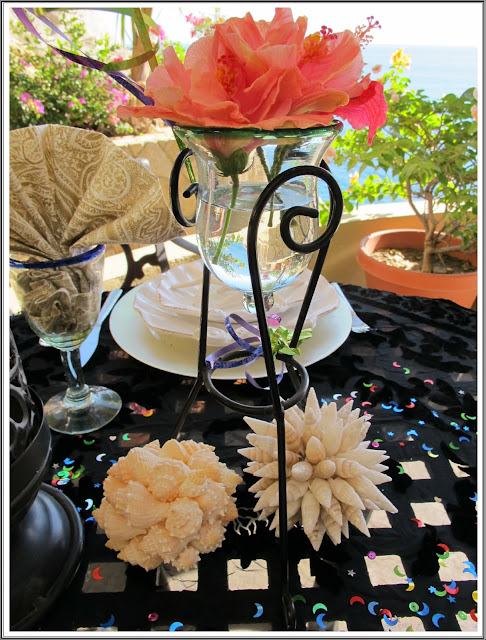
So, I set a table for two with an ocean view
celebrating the big day.


I chose these textured dishes atop a silver charger for
our table for two.

A couple of shells top these lovely shell dishes.


The table is topped with a scarf I keep here for cooler
evenings.  I threw confetti on top of it.  At the
restaurant last night they had confetti on our table and
when they came to sing to me, they threw some more 
on the table.

Joni, my sister at 
used to always send me
cards with confetti inside.  When I would open the card, 
the confetti would go all over the floor.  Hubby and I
reminisced about that with the confetti on the table last night.


The fresh flowers were picked right outside the front door.

The kids called from home and said to enjoy the
warm weather because it is "a frozen tundra" there.  
When you are sitting in the warm sun, it is hard to imagine that
the weather at home can be so awful.


A table by the sea makes it even harder to think of cold weather.

This is our everyday flatware here at the house.


I placed a napkin fan in the blue rimmed hand blown
goblets that we buy here in Cabo.
The home is filled with plates and glassware from Cabo.


More shell balls decorate the table.


For Christmas gifts, I made each of the kids a book
of pictures from Cabo.


There's lots of fun and lots of food represented in this
book.


This was the first time I tried Costco's Photo Books
and I was very pleased.  They got them printed and
delivered in less than a week right before Christmas
and their site was very easy to use.

I brought a copy to leave at our home here so that
others can see all of the fun things to do here and
fun places to eat.


Alas, I have to head back to the
"frozen tundra" - sigh! -
but I couldn't have had a better birthday.

I will be posting with 


Follow me on Instagram