Saturday, June 30, 2012

Summer Houseboating - My Building Project

(Photo from Bravadayachts.com)

If you have been with 
Purple Chocolat Home 
for very long you know we love 
boating at Lake Powell 
in the summer.  
We have had two houseboats and the one that
we call our "new" houseboat is now twelve years old and
we are now ready to retire that boat and are in the process
of building a new boat like the one above.  Many of the
boat manufacturers have gone out of business with the 
changes in the economy but 
Bravada  Yachts 
which is based out
of Phoenix are still building beautiful houseboats.


Since we can easily fly in to Phoenix we
were able to visit about once a month to check on the
building process.  The hull starts with a huge piece
of aluminum which is then bent up to create the bottom
and sides of the boat.


Then floors and walls are framed in similar
to home construction.


With side walls added, it quickly starts to look
like a houseboat. Plumbing, electrical,heating and cooling
are next followed by cabinets, baths and kitchens.


Up to eight or so boats are under construction at once
and as you look back through the living room of ours
you can see other boats along the line.


The design process is fascinating as most buyers
are from out of town.  The designer Tracey (the co-owner with her
husband Jim)
sent a questionaire and some pictures to define colors and
styles and then had some options laid out to look at.
The whole process took an afternoon as we first
chose color and style, then went through fabrics, lighting
options, carpet, floors, tile, etc.  Hubby had spent quite
some time designing the basic floor plan to maximize
the number of staterooms but small changes could
be made while we were there designing the interior.

It was nice to spend a night in Phoenix and be able
to sleep on some of the picks and return, review
and change a few things.

We started the process in January and the boat was
to be in the water June 1st.  As with most building
projects, things were running a little late, and the boat
was to be in the water last weekend.


This was the boat when I saw it last weekend as we
were putting up mirrors and filling kitchen cupboards. 
There was still plenty of work to be done and she wasn't
in the water yet.  


Outdoor furniture had been delivered and the housboat
employees were opening the boxes and getting
the furniture set up.  (I was thrilled not to have to do that!)

The temperature was about 104 and there was
no air conditioning inside, so hanging mirrors in
 the staterooms was sweltering.  It isn't
finished yet as hubby and youngest son are
down in Page, Arizona working again
this weekend, but here is a sneak peek of the
salon.


As you can imagine, cooking and eating is a big part
of our boating experience and there is a great indoor
kitchen (a huge upgrade from our first houseboat where
we used a marine fridge and a camper sized stove)


And also a wonderful outdoor kitchen on the 2nd level.


These are just a few tempting shots.  I will follow up
with another post when the project is finished.

I hope that will be quickly as we have a couple's trip
planned for her maiden voyage in a little over a week.

I will be sharing this with

Thursday, June 28, 2012

And Baby Makes Eight


Another sweet angel has come to join our family.  Doesn't
she look like she has a smile on her face meeting her 
family for the first time?  


Meet Baby Jacquelyn.  Her three year old brother
has been calling her by that name since he found out
she was a girl.  He even argued with his brother
and sister when they liked other names.  
He would say things to mama like, "Did Baby Jacquelyn
sleep well last night?" (while she was still in mama's tummy),
"Is Baby Jacquelyn coming today?", "How's Baby Jacquelyn
doing?", etc.  He pronounces it in two syllables like
Jack-lyn.  

I love my real name of Jacqueline
but have almost always
been called Jackie (which I don't love so much) so when
I started blogging I chose to go by my real name of 
Jacqueline.  Joni (my sister at Red Couch Recipes)
thought that was so funny that I would choose to
go by my real name.  I often tell friends I would
prefer to have them call me by Jacqueline.  Now
we have a real Jacquelyn and I hope no one ever
calls her Jackie.


Of course Grandma LOVES her name
and I also like the slight change in spelling
too.  

This is grandbaby number eight.  We feel so blessed.


This is the dress she came home in and her big
"Sissy" is so happy to finally have a sister.
We are all so grateful she is here safe and sound.

I will be sharing these girly shots on


Monday, June 25, 2012

Best Homemade White Bread Loaf and My First Tomato


Ahhh..... the aroma of homemade bread - what could be better?

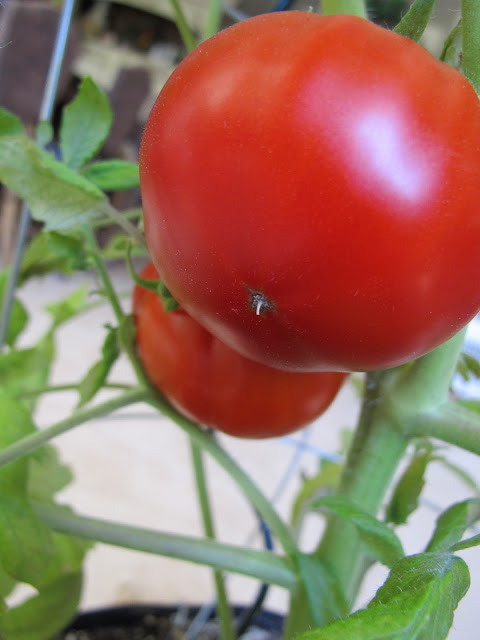
I will tell you - fresh bread with my first fresh tomato from the garden!
My first tomato is always celebrated
and I honor the occasion by making a tomato sandwich with it.


Nobody in my family loves the homegrown tomatoes the way I do.
It is one of those childhood things!


In the past I have always tried buying one of the big tomato
plants in the gallon containers but they don't produce
tomatoes any quicker than the little ones.  

This year I kept the plant in the house in my big
curved kitchen window and it was like having it
in a greenhouse.

I had my first tomatoes in the second week of June.
Now for some of you that isn't early but for us, that
is at least a month if not six weeks early.


Fresh tomatoes have to have homemade white bread, so I had to
make up a batch in honor of my tomatoes.  


Speaking of childhood memories - 

This is what I used to bring to school for my lunch
in the fall.  I would bring a knife and cut my fresh tomato
at school.  Of course now I would have to bring a
 plastic knife.  
I didn't want the bread to get soggy so I cut it there at school.

It is still my favorite lunch in the summer but I have upped
the flavor with basil mayonnaise.  Wow, what a difference
a little basil makes.

Basil Mayonaise

Just put through your food processor 1/2 C. mayo and
2 T. fresh basil and grind until the basil is blended in.


Now for the recipe for the best homemade white bread I have ever had.

Best White Bread
(I received this recipe from a friend when our church youth were
going on a pioneer trek.  She was to make it in a dutch oven.  She 
didn't make bread so wanted me to show her how.  I told her there
was no way you could make this much bread in one dutch oven. 
I told her to cut it in half and bake two loaves.  She did and she
was the only one with successful bread on the trek. 
 Everyone else's was burned on the top and bottom and gooey in the middle.
  It pays to practice.  I thought it was the most amazing white bread
I had ever had and we have been making it since.)

11 C. all purpose flour
1 1/4 C. powdered milk (a great way to use up your food storage
of powdered milk)
1 1/2 T. SAF yeast (bread yeast)
3/4 C. vegetable oil
3 T. honey
1 T. salt
4 C. warm water
Place all of the above in the large mixing bowl of your Kitchenaid
or other mixer with a dough hook.  Let the dough mix and knead for
10 minutes.  Remove the dough hook and place in a large bowl lightly
sprayed with cooking spray.  Cover with plastic wrap and let rise 
until double - usually about 1- 1 1/2 hours.  Punch down and divide
into three equal portions.  Shape into loaves and place in greased
one pound bread loaf pans - 8 1/2 x 4 1/2 x 2 3/4 inches.
  Let rise until double - I like to get down on eye level and
make sure the bread is at least 1 1/2 inches above the top of the pan.

Place in a preheated 350 degree oven and bake about 30-35 minutes.
Take it out of the pan and let it cool on a rack.  If you bottom seems underdone,
put it back in the pan and bake it another 5 minutes or so.

Makes 3 loaves of bread.


Garden fresh tomatoes + homemade bread = a match made in Heaven.


I bought this handy Presto Bread Slicing Guide years ago.  Using an electric
knife, I can slice even slices of homemade bread quickly.  It makes for much
nicer sandwich bread. You can find these online by clicking on the above link.
(I think there are cheaper variations out there, but this is the one I have had for years.
I was surprised at the price.  Feel free to choose a different one.  It is a perfect 
gadget if you make your own bread.) 

 If you don't make your own bread, give it a try
it really is easy.  Yes, it takes a little time but fit the steps in between doing other things.

Tips:
Make sure your water is warm, not cold or hot by running it over the inside of your wrist.

Let the dough be sticky.  It should pull away from the bowl but don't put in
so much flour that it leaves the bowl clean.  The softer the dough, the softer the bread.

Take the time to let it rise.  If it over-rises, just punch it down.  It is fine.

Use a one pound bread pan to get a nice shaped loaf. A one pound measures about
8 1/2 x 4 1/2 x 2 3/4.  Many loaf pans are one pound and a half and if you use
those, make only 2 loaves with this bread recipe.  You will probably need to bake 
it longer.

Take the time to let it rise in the pan.  Get down to eye level with the
bread and be sure it has risen above the pan a good inch and a half.
I think this is where most people fail and they get a small loaf.

Don't underbake.  You want it baked all the way through.

I will be posting with
Foodie Friday
On The Menu Monday


Wednesday, June 20, 2012

In My Pretty Garden


In my pretty garden the flowers are nodding.
"How do you do?" they say,
"How do you do today?"
In my pretty garden the flowers are nodding.

These are the words to a song I sang in
Primary when I was a little girl.  I always think of these
words from the song, "In The Leafy Treetops", Anonymous,
when thinking of my garden.


Yes, I am in love with flowers and only wish I had more
space for them and that they would last longer.

These are the last of the spring flowers - beautiful 
yellow and purple and deep dark purple iris blossoms.


These blossoms are so dark they are almost black.  I love the
way the camera captured the edges of these and put them
in focus while it softened all of the rest of the picture.


The placesetting is simple today because I want to focus on my 
pretty plates all done in grayscale with just the purple flowers
in color.  


These subtle plates complement rather than compete with the
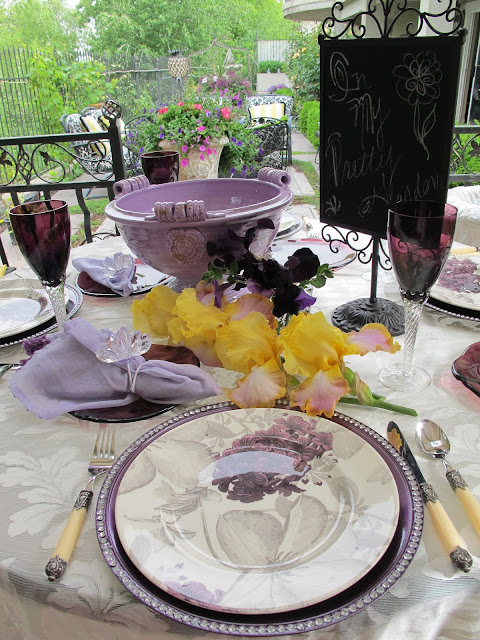
fresh flowers.

Aren't the colors of these iris blossoms fabulous?  The table is
strewn with the blossoms.


Just a purple charger and cream flatware on my favorite
outside tablecloth that is such a great neutral backdrop 
for my outdoor tables.


My amethyst salad plates sit off to the side.


Each of them is topped with purple napkins and a crystal
flower napkin ring.


My amethyst goblets are more delicate than some of my other
goblets so they don't come out as often.


I love this purple ceramic I got last summer.  It will be wonderful
for a salad.


It has a rustic classic charm to it.


Other little floral posies are placed in the pretty lavender glasses
my daughter in law gave me for Mother's Day.


I want to enjoy the out of doors as much as I can before 
the summer heat comes.

Posting with


Sunday, June 17, 2012

Flower Garden Chair

Take a rusty iron chair and add some
sheet moss, floral foam and fresh roses
and you have a fabulous garden piece.


I bought two rusty chairs years ago from my local 
garden center
 and almost every year I have some kind of shower
or garden party that I deck out the chairs for.


It is especially nice to be able to do them when the roses
are in bloom in the garden, but I have purchased
roses before.


A little ivy draped along the legs and top help to soften 
the chair.


The sheet moss will last all summer and the chair has a large
garbage sack under the moss to hold in the water.


The roses can be wound into the ivy but because they aren't
in the water they won't last as long.


I showcased three kinds of roses in the chair today. 
They are at their peak.


This view shows the moss covering the plastic and
the floral foam.


The chair was made for garden arrangements as it has a bottom
and a lip. I lined it with a clear 33 gallon trash
bag cut down to about 6 inches high.  Floral foam 
then fills the bottom and water is added to keep the
foam wet.  The flowers and greenery cover the foam.


I just twisted the ivy around the chair.


And I tucked roses and alyssum into it.
You could use any flowers you have.


It only took minutes to transform and the flowers can be replaced
when they wilt. 
Ready to move into place.
 In this shady side of the deck they lasted
several days.


Enjoy your flowers!
I will be posting with

Follow me on Instagram