Showing posts with label Easter Eggs. Show all posts

Wednesday, March 28, 2018

Pink and Green Easter Table Two Ways


Are you like me and just love setting the
table for a party?  It definitely is one of my
happy places.  

This table was set for my craft group.  We get
together once a month and craft together.
I feel so lucky to have been invited into
this group.  We were talking about it and it
all started a few years ago at Christmas time
when my friend Laura called and said that
some of them were doing a Christmas home
tour that night, and did I want to come. 

Of course I did!!

But was I also willing to let them come visit
my home.  Well, I had spent the whole day baking
for a church dinner and the counter was a mess,
and the ward dinner started in half an hour, but
hubby pulled through and helped me spiff up
the kitchen and I was able to do both the
ward dinner and the home tour.  That was the
start of our craft group.


Since Easter is this week and we were working
on an Easter craft, I decided to set an Easter table.


Normally I would do fresh flowers to bring
in spring, but I had just purchased these beautiful
silk peonies, so they became the centerpiece, sitting
on a grass runner.


These adorable pink and green dotted bunny plates
were purchased several years ago from Home Goods.
Since I was in junior high, pink and green have been
one of my favorite color combinations for spring.


I sat them on my favorite white wood chargers
from Pier 1.

We were having a fondue dinner so I had
two color coded fondue forks for each person
and a brass basket for scooping out things that
don't skewer that well.


The little white rabbits were a favor for
everyone.  I added the moss green wire
and some flowers.  


A little bunny tag was
used for place cards and two kinds of
flowers and a little hot glue and I
had pretty matching napkin rings.  
I only had four of each napkin and there
are eight of us, so I alternated them.


 These pretty pink goblets were purhased
from Pier 1 a couple of years ago.


The final touch for the table was using
my chiavari chairs and covering them with
curly willow chair covers in blush.  I used these
for our Christmas table and they add such a beautiful
touch.  They are from CV Linens and very
reasonable.


I had used the same plates and goblets
for a table in my dining room with a bunny fur
runner.


I used sterling silver flatware for this fancier
table, and the bunnies were nestled in the fur runner.


This glittering bunny was from Pier 1 last year
and was featured atop a gold embellished marble
cake pedestal.  The table featured three of these.


Our fondue dinner consisted of three courses.
The appetizer course was a Southwest Cheese
and an Italian Pizza Cheese.  The main course
was chicken, steak, shrimp and potstickers cooked
in oil.  The final course was chocolate and caramel
fondue with fruit, brownies and cookies for dipping.


It all finished with creating our Grandin Road
copycat Easter Eggs.  Brenda spent hours figuring
out how to create the harlequin pattern and trace
it on for us.


These were mine.  I painted my butterfly egg
pink and added glittered dots.

Brenda had prepped the eggs by painting them
white, then drawing on the pattern.  The eggs
were from Hobby Lobby.


Karen decided to leave her eggs the original color
from Hobby Lobby and she painted on Mod Podge
and glittered them with Martha Stewart Glitter

It was a fabulous evening filled with fun, food,
crafting and lots of fun conversation.

I hope you have a wonderful Easter.


I will be posting this with


Wednesday, March 9, 2016

Chocolate Easter Eggs with Edible Gold Leaf - a Tutorial


I love to play with my food!!
I love to play with chocolate!!!
I love to create beautiful food!!!!

Ok, so you know me by now.  Food is one of 
my favorite artistic palettes, and so today
I am going to do a tutorial on how to add
edible gold leaf to your foods - chocolates, cakes,
fondants, etc.  


You have seen me adding gold leaf to
French Macarons lately, so I thought I
would show you how to add gold leaf to
any of your foods. 


 A little goes a long
way, so even though real, edible 23 K
gold leaf is rather expensive, you can 
add a lot of wow, for just a little bit of money.


I started with my freshly molded chocolate
eggs.  You could even do this on chocolates
that you bought - just to make them more
spectacular.


Edible 23 K gold leaf comes on pages like this. 
I ordered mine on Amazon.  Make sure you buy
EDIBLE gold leaf, not just the craft
gold leaf at the craft store!  I got a large pack,
but you can buy much smaller.  It comes in sheets
between protective tissue paper, like pictured above.
It is delicate,
so you don't want to touch it with your hands.


Place a little piping gel on a surface, and use
a soft brush to apply the gel where you want
the gold to adhere.  On some of the chocolate
eggs I brushed a small amount, and on a few
I covered the whole egg.  

I just used a tube of sparkle piping gel found
in the cake decorating section.


Wipe the brush clean on a paper towel or the
back of your hand.  There will be a little left on
the brush so that when you touch it to the gold
it will pick it up.  Carefully touch and lift the
gold.  
Use the tissue paper liners to help control
how much gold you pick up at a time, by 
closing the booklet a little to hold the leaf
down.


 Touch the gold to the area of the chocolate
that you have put piping gel on.  Lift
the brush.  Pat down if necessary.


You are going for a rustic look,
so don't worry about how perfect it is.
Add as much as you like, adding another
piece of leaf if you prefer to get the
desired effect.


For the egg that was fully covered, I laid the
sheet of gold on top of the egg painted with piping
gel, using the tissue paper liners to handle the page of gold.  
Use a dry brush to pat it down.  


I also used a little piping gel to attach some
candied violets.  


I decided to add a little interest to my
glitzy chocolate Easter Eggs by painting
some with piping gel and then sprinkling
them with Disco Dust (also online!)

With a little gold and purple,
these eggs are fit for royalty!


Any Easter Bunny would be proud
to deliver these Easter Eggs.  It reminds
me of my favorite Easter Bunny story,
The Country Bunny and the Little Gold Shoes.

Don't these look like Easter Eggs
for someone special?  Maybe that
someone special is you!!  They were
so easy and fun to make.

Don't forget about my Cookbook Giveaway -
Eat Dessert First
with over 280 colored photos and recipes.


There are multiple ways to enter,
and you don't have to live in the United States
to win!!

The give away ends
tonight - Wednesday, March 9th, at midnight!


Thursday, March 19, 2015

Jeweled French Script and Sheet Music Easter Eggs


How yummy are these elegant Easter Eggs
decoupaged with French script, sheet music and 
glitter and accented with jewels.

My little nest is certainly going to be jeweled this year.


I couldn't decide which I liked better -
French Script or sheet music


so I decided to do some of each


and a couple varieties of the music sheets.


After I finished those, I knew I needed
to add in some glittering metallic eggs.

I promised the instructions but really
they are so easy, this is a grade school
level craft project with a little more
sophisticated supplies!

As I started this craft project I was taken back
to first grade where my dear teacher Mrs. Laughlin
loved crafts and taught me to love them too.  

She would do what in my first grader's eye
were HUGE paper mache projects - a Santa
Claus for Christmas and a turkey for Thanksgiving
and I am sure many others.  When you were finished
with your assignment you could go and work on the
large project.  As I picture it in my mind they were
near life size paper mache projects.  Thank you to
wonderful teachers whose inspiration lives on in us!!


Jeweled French Script and Sheet Music Easter Eggs
Instructions

Purchase extra large eggs at the Dollar Store
(Mine are in two sizes and are between 3.5 and 4.5 inches tall.)
1 8 x 11 sheet of printed paper per egg
(I purchased scrapbooking paper but you could print your own.)
Mod Podge
(I used the one with glitter in it.)
Jewels or buttons from the craft store
Assorted Ribbons from the craft store
Additional glitter 
Glue gun

Remove the label from the plastic eggs
and any candy from the inside.  Tear the paper
into strips about 3/8 inch wide and tear
off the ends so you get a uniform look on
all edges of the strips.

 Begin by painting the Mod Podge on about
half of the plastic egg.  I found it was easier to
paint it on with my fingers. Lay a strip around 
the egg on a glue section and
 starting in any direction you like.  Tear off the strip
when the ends meet.  Wet the paper on the outside
surface with additional Mod Podge and smooth
out any wrinkles.  You will especially have
gaps when going around the pointed ends, just
wet with the glue and press until it lays flat.

Continue to do so until the egg is covered.

I found it easiest to sit the egg on the bottom
end of a paper cup that I had cut out the bottom of.
That way I had a stand for the wet egg.

Let dry.  The Mod Podge will go from white to clear
as it dries.

You can see in the first picture the glitter in
the Mod Podge.  I had planned on glittering
them after they dried and I did on one or two but
liked the soft glitter effect of the Mod Podge with
glue in it so I didn't add any more.  If you desire
to add glitter, lightly brush on more Mod Podge
and sprinkle on glitter.  Do it over a paper plate
so you can pour the extra glitter back into the bottle.

For the metallic eggs, I sat them on the bottom
of a cup and painted them silver.  When they
had dried I brushed on the Mod Podge with a
sponge brush, only covering the top half and
sprinkled glitter on it.  After letting that become
dry to the touch, I painted the Mod Podge on the
bottom half and sprinkled glitter on it.  Again
let them dry completely.

Apply ribbon and jewels using a hot glue gun.
( I found jewels that had no backing instead of 
jeweled buttons in the craft section at Hobby Lobby.
I liked working with those rather than a button but
a button would work too.)


Stack them deep or place them individually,
they are little works of art and something easy
to do with family or friends.

I was inspired by a photo posted
by Lindsay of book print covered eggs
but she had no source for
the photo.  Whatever print you choose, these
are fun, easy and yet elegant.


I will be posting these with
Home Sweet Home


Saturday, April 7, 2012

Chocolate Peanut Butter Eggs


Molded Peanut Butter Cup Eggs
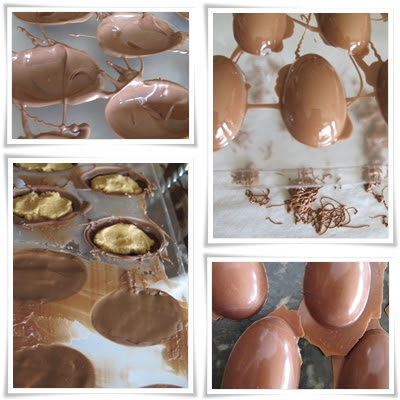
From top left to right

1.  Fill candy molds with melted chocolate discs or
tempered couverture chocolate.
2.  Completely coat inside of mold then turn upside
down to remove excess chocolate. Turn over and
scrape off excess chocolate with an offset spatula.
3.  After the chocolate has hardened in the fridge
fill with peanut butter filling.  Do not fill to the top -
leave 1/8 inch so additional chocolate can be added
to cover the filling.  Spoon or pipe additional chocolate
on being sure to seal it at the sides of the mold.  
Remove excess chocolate with your offset spatula.
4.  Return to the fridge to set the chocolate then turn
over onto the countertop.  Remove any excess chocolate
around the edges with a knife. Smooth the edges with your
fingers, using the heat of your hands. 
Be careful as the heat of your hands will
melt the chocolate so hold the candy just by the edges.

Peanut Butter Filling
(The ones I have made in the past have graham cracker crumbs
in them but my daughter found this recipe at Hey Jen Renee and we loved it
too.)

1 C. creamy peanut butter
1/4 C. soft butter
2 C. powdered sugar
1-2 T. milk
Mix everything together.  If it seems too dry add a little
additional milk.  It should be the consistency of play dough.


I made 36 small eggs (2 1/4 x 1 1/8) and 2 large
eggs (about 3 1/2 x 2 1/4 ) with this recipe of filling and
I probably used 2 lb. of chocolate discs.


We used to have a wonderful cake and candy store in town
named Shepherds Cake and Candy,
but they are gone now.  That is where I bought most of my
candy molds from.  You can buy molds online - just Google
plastic candy molds.

click on the above to purchase if you can't buy it locally.  
It isn't like the old molding discs where it tastes bad.  
I am picky about my
chocolate and usually use couverture chocolate but it is
finicky for beginners and I highly recommend Guittard's 
"chocolate" discs.  These tasted great.  The above link
also contains great candy molds.


I will be posting these with

Follow me on Instagram